
Building your own Trail Cam - 101
-
MuleyMadness
- Site Admin

- Posts: 9997
- Joined: Thu Oct 10, 2002 9:34 pm
- Location: St. George, UT
- Contact:
Building your own Trail Cam - 101
Okay MM friends,
Here is how and where I get my stuff to build my own trail cams. It's actually quite easy now days, was a bit tougher when I first built them a few years ago. I've built about 4 of them and will likely build a couple of more.
First here is the pictures of the one I just finished...
Here is how and where I get my stuff to build my own trail cams. It's actually quite easy now days, was a bit tougher when I first built them a few years ago. I've built about 4 of them and will likely build a couple of more.
First here is the pictures of the one I just finished...
- my hand for reference
-
MuleyMadness
- Site Admin
- Posts: 9997
- Joined: Thu Oct 10, 2002 9:34 pm
- Location: St. George, UT
- Contact:
Re: Building your own Trail Cam - 101
Here is the place to order the kit from...(they are very well done and this guy does most of the hard work for you already)
http://yeticam.com/Kits.htm
Mine is the top left kit, or the Sony S600.
http://yeticam.com/Kits.htm
Mine is the top left kit, or the Sony S600.
-
MuleyMadness
- Site Admin
- Posts: 9997
- Joined: Thu Oct 10, 2002 9:34 pm
- Location: St. George, UT
- Contact:
Re: Building your own Trail Cam - 101
Here is the link to the PDF manual to finish assembling the kit (it's pretty simple), the manual tells you exactly what to do.
http://yeticam.com/Manuals/YetiCam%20Kit%20Assembly.pdf
http://yeticam.com/Manuals/YetiCam%20Kit%20Assembly.pdf
-
MuleyMadness
- Site Admin
- Posts: 9997
- Joined: Thu Oct 10, 2002 9:34 pm
- Location: St. George, UT
- Contact:
Re: Building your own Trail Cam - 101
Now you'll need to get a camera from ebay, roughly 70.00 dollars or so for them...
http://search.ebay.com/search/search.dl ... y+DSC-S600+
http://search.ebay.com/search/search.dl ... y+DSC-S600+
-
MuleyMadness
- Site Admin
- Posts: 9997
- Joined: Thu Oct 10, 2002 9:34 pm
- Location: St. George, UT
- Contact:
Re: Building your own Trail Cam - 101
And finally here is the link to the PDF manual and how to MODIFY the Sony S600 so run/work as a trail cam.
http://yeticam.com/Manuals/Modification ... on%202.pdf
http://yeticam.com/Manuals/Modification ... on%202.pdf
-
MuleyMadness
- Site Admin
- Posts: 9997
- Joined: Thu Oct 10, 2002 9:34 pm
- Location: St. George, UT
- Contact:
Re: Building your own Trail Cam - 101
This manual will tell you exactly how to use the control board that operates the trail cam.
http://yeticam.com/Manuals/YetiCamBoard ... nual13.pdf
http://yeticam.com/Manuals/YetiCamBoard ... nual13.pdf
-
MuleyMadness
- Site Admin
- Posts: 9997
- Joined: Thu Oct 10, 2002 9:34 pm
- Location: St. George, UT
- Contact:
Re: Building your own Trail Cam - 101
Now here is the real question...
Tired of wasting money on game cameras that don't work as expected? You're not alone! The large LCD display will let you view all of your photos right in the woods without needing to carry along a card viewer. You can also read the time and date the photo was taken on the LCD display. This system is very small too, which means you can easily conceal it in the woods. Powered by 2 AA batteries and 1 9 volt battery. This ensures your system will be light, and easy to carry deep into the woods unlike other systems that use 4 to 6 C or D cell batteries only lasting weeks at a time, and expensive to replace!
This system is built from our premier motion controller board. The PIR motion detection electronics used are second to none in the industry today. With a detection range of 80+ feet, so you won't have to worry about missing any photos. You won't have to worry about false photos either like you see on many commercial game cameras on the market today.
Unlike many game cameras made today this system uses the higher end and more sensitive CCD imaging sensor to capture your high resolution photos. Almost every commercial game camera on the market today uses the less expensive CMOS imaging sensors that are much less sensitive to light and produce fuzzy/soft photos. With this Sony CCD imaging sensor your photos will be sharp and crisp, and you will be able to make out every inch of that trophy buck!
Rabid Mode feature it will guarantee you will capture more photos than other game cameras on the market today. Did you ever notice that almost every game camera on the market today needs a minimum of 1 minute to store a photo before it can take the next photo? In a true "trail" situation this is totally useless! What happens when you have a string of doe on a trail, or a mature buck following a doe during the rut? Why settle for a game camera that only captures the lead animal on a trail?
Frustrated with trying to setup your current game camera? Don't know how to program it or can't even figure out how to easily attach it and lock it to a tree? Never have those problems again with the a home brew camera. With our easy to setup DIP switch you can easily adjust delays between photos, day/night and 24 hour operation, and even setup for movie mode.
Here is why...WHY the heck would you want to build your own????
Tired of wasting money on game cameras that don't work as expected? You're not alone! The large LCD display will let you view all of your photos right in the woods without needing to carry along a card viewer. You can also read the time and date the photo was taken on the LCD display. This system is very small too, which means you can easily conceal it in the woods. Powered by 2 AA batteries and 1 9 volt battery. This ensures your system will be light, and easy to carry deep into the woods unlike other systems that use 4 to 6 C or D cell batteries only lasting weeks at a time, and expensive to replace!
This system is built from our premier motion controller board. The PIR motion detection electronics used are second to none in the industry today. With a detection range of 80+ feet, so you won't have to worry about missing any photos. You won't have to worry about false photos either like you see on many commercial game cameras on the market today.
Unlike many game cameras made today this system uses the higher end and more sensitive CCD imaging sensor to capture your high resolution photos. Almost every commercial game camera on the market today uses the less expensive CMOS imaging sensors that are much less sensitive to light and produce fuzzy/soft photos. With this Sony CCD imaging sensor your photos will be sharp and crisp, and you will be able to make out every inch of that trophy buck!
Rabid Mode feature it will guarantee you will capture more photos than other game cameras on the market today. Did you ever notice that almost every game camera on the market today needs a minimum of 1 minute to store a photo before it can take the next photo? In a true "trail" situation this is totally useless! What happens when you have a string of doe on a trail, or a mature buck following a doe during the rut? Why settle for a game camera that only captures the lead animal on a trail?
Frustrated with trying to setup your current game camera? Don't know how to program it or can't even figure out how to easily attach it and lock it to a tree? Never have those problems again with the a home brew camera. With our easy to setup DIP switch you can easily adjust delays between photos, day/night and 24 hour operation, and even setup for movie mode.
-
Mike Honcho
- Fawn

- Posts: 39
- Joined: Thu Jul 03, 2008 10:35 am
- Location: Southern Utah
Re: Building your own Trail Cam - 101
Sweet! Thanks for the info. I'm definetly going to try this.
"You can't fix stupid!"
-
MuleyMadness
- Site Admin
- Posts: 9997
- Joined: Thu Oct 10, 2002 9:34 pm
- Location: St. George, UT
- Contact:
Re: Building your own Trail Cam - 101
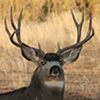
Here is a sample from a couple of my "Home Brew" built trail cams.
Got any other questions? Ask away.
Brett

Got any other questions? Ask away.
Brett
-
MuleyMadness
- Site Admin
- Posts: 9997
- Joined: Thu Oct 10, 2002 9:34 pm
- Location: St. George, UT
- Contact: