
by Brett Wilson
How To Build a “Home Brew” Trail Camera
Intro: A lot of guys/gals don’t have the patience to build ‘home brew’ trail cams, but for those who do…they can’t understand why everyone else doesn’t. 🙂
Although it will take some patience, and a learning curve; building ‘home brew’ trail cams is a very fun and addicting hobby. Listed below is a step by step process of what you’ll need and how to make your own.
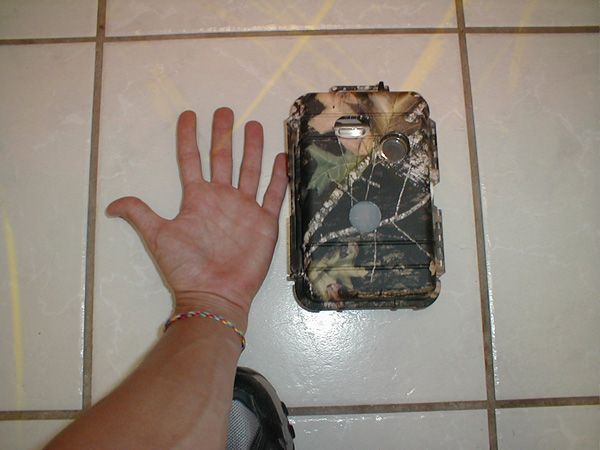
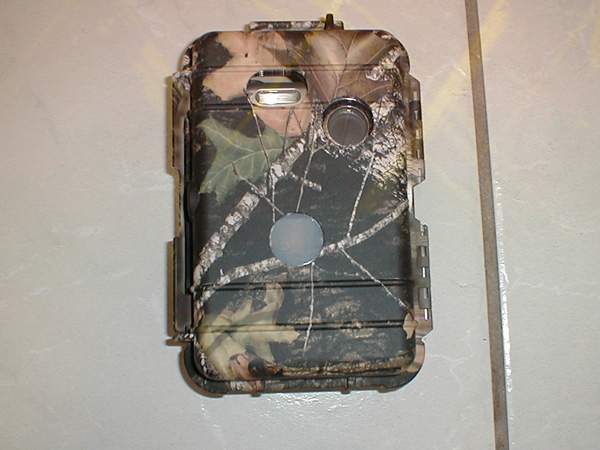
First there is a few items you’ll need to buy, but I’ve tried to keep this as cheap as possible yet still be a high quality build. This ‘home brew’ trail camera is my personal favorite. I’ve actually built 3 different models (Olympus D-360L, Sony S600, & Sony P41). I’ve hand good success with all three, but the S600 gets me the clearest pictures. However I still love the Sony P41 also, it’s hard to beat and the shutter speed is second to none. I no longer used my D-360L builds as the others seem to be better. This tutorial should give you a rough idea on how to build your own. Mine work excellent and have literally got me thousands of photos over the years. I actually entered a trail cam contest picture with one of my ‘home brew’ builds and won several hundred dollars worth of products. 🙂
A. Parts:
- camera (Sony P41 & S600) these are some of the most popular cameras
- water proof case
- Control board
- Lock & Key to secure camera
Tools needed:
- Small gauge soldering iron(15 or 25 watt) with heat control. If you don’t have heat control, it’s fine without. (I bought the smallest tips/one I could find from Radio Shack
- 30 gauge wire (buy from Radio Shack)
- Marine Goop or Loctite glue
- Very small phillips screwdriver for screws on camera
- Electrical tape or shrink wrap for wires
- Exacto knife/razor blade.
- Solder of course for the soldering iron, smallest you can find.
- Tooth pics (help for cleaning off excess glue)
B. Building
Rather than teach you how to do everything yourself, I say simply buy one of these kits. This company has done most of the hard work for you and he makes excellent products, I’ve purchased several of these myself (the kit on the top left, or Sony S600).
Here is the site to order your control board.
And here is a link to the manuals etc. you’ll need to finish the job once you get your kit (it’s really not difficult).
http://www.snapshotsniper.com/TechInfo.htm
You’ll need to find a used camera off Ebay or Craigslist, here is a search link on Ebay for the Sony S600 camera. These cameras are becoming more and more difficult to find. Prices vary, especially depending on the time of year. These models are very popular and are scooped up very quickly by prospective buyers. Roughly $70.00 dollars is what it’ll cost you.
http://www.ebay.com/sch/i.html?_nkw=Sony+DSC-S600&_armrs=1&_from=R40&_ipg=&_trksid=m37
Here is the links to two different versions you’ll need to modify or “HACK” the camera once you receive it. This is by far the most difficult part of the process, you’ll want to be very careful during this stage to make sure you don’t ruin your new camera. I’ve personally ruined two of them. So go slow, and use the proper equipment and you should be fine. One word of advice here is to buy the smallest soldering iron available (one with the smallest end/tip).
http://www.muleymadness.com/media/uploads/2011/12/Mod-Sony-DSCS600.pdf
http://www.muleymadness.com/media/uploads/2011/12/WireSonyS600.pdf
C. Memory Sticks
For the Sony S600 camera you’ll need the Memory Stick Duo Pro card, it’s a bit more expensive than some of the others.
D. Cost
Total cost will be roughly 210.00 dollars depending on how cheap you can get your used camera.
Why Home Brew?
So the real question is why would you want to build one of these, it just seem like a lot of work and to much money?
Well here’s why…
Tired of wasting money on game cameras that don’t work as expected? You’re not alone! The large LCD display will let you view all of your photos right in the woods without needing to carry along a card viewer. You can also read the time and date the photo was taken on the LCD display. This system is very small too, which means you can easily conceal it in the woods. Powered by 2 AA batteries and 1 9 volt battery. This ensures your system will be light, and easy to carry deep into the woods unlike other systems that use 4 to 6 C or D cell batteries only lasting weeks at a time, and expensive to replace!
This system is built from our premier motion controller board. The PIR motion detection electronics used are second to none in the industry today. With a detection range of 80+ feet, so you won’t have to worry about missing any photos. You won’t have to worry about false photos either like you see on many commercial game cameras on the market today.
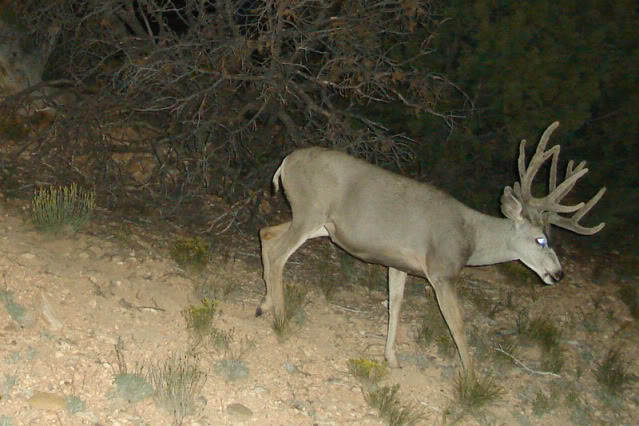
Unlike many game cameras made today this system uses the higher end and more sensitive CCD imaging sensor to capture your high resolution photos. Almost every commercial game camera on the market today uses the less expensive CMOS imaging sensors that are much less sensitive to light and produce fuzzy/soft photos. With this Sony CCD imaging sensor your photos will be sharp and crisp, and you will be able to make out every inch of that trophy buck!
Trail Cam Mode feature it will guarantee you will capture more photos than other game cameras on the market today. Did you ever notice that almost every game camera on the market today needs a minimum of 1 minute to store a photo before it can take the next photo? In a true “trail” situation this is totally useless! What happens when you have a string of deer on a trail, or a mature buck following a doe during the rut? Why settle for a game camera that only captures the lead animal on a trail?
Frustrated with trying to setup your current game camera? Don’t know how to program it or can’t even figure out how to easily attach it and lock it to a tree? Never have those problems again with the a home brew camera. With our easy to setup DIP switch you can easily adjust delays between photos, day/night and 24 hour operation, and even setup for movie mode.
Image Gallery (click to enlarge)


Ok Brett you got me hooked. My S600 is on its way. I have been running trail cams for years but have never tried to build one. This sounds like a lot of fun.
Thanks! I’m sure i will have some questions for you.
I have been building cams for over a year now ,I think I am on number 25 .
Yea I have a fortune tied up in them ….but the picture quality and the feeling you get when you finish one of these Homebrews is second to none.
I have hacked all of the usual cams. The s600 is a nice cam ,but not one to start with.
Get your feet wet with a P32 or P52 ,the Nikon L11 is also real easy.
Get ready for the addiction my friend.
For under 200 dollars know you can buy trail cam’s that are smaller, have a Lcd, 10 megapixels, and more picture options. I still thinks its cool to build one though.
Now that I found this article, going to have to build one this winter. Can’t wait till spring to try it out on bear
Where can I get a board to replace the one I have that isn’t working? I have a PixController LE V2, I have been looking for a replacement and it seems the Pixcontroller is no longer made.
Warren,
I have a brand new PixController board, not sure on version but I’ll bet it would work.
Drop me an email if you want, I’d be willing to sell it to you.
brett@muleymadness.com